The outside of our album cover

Front of Our Digipak
Digipak
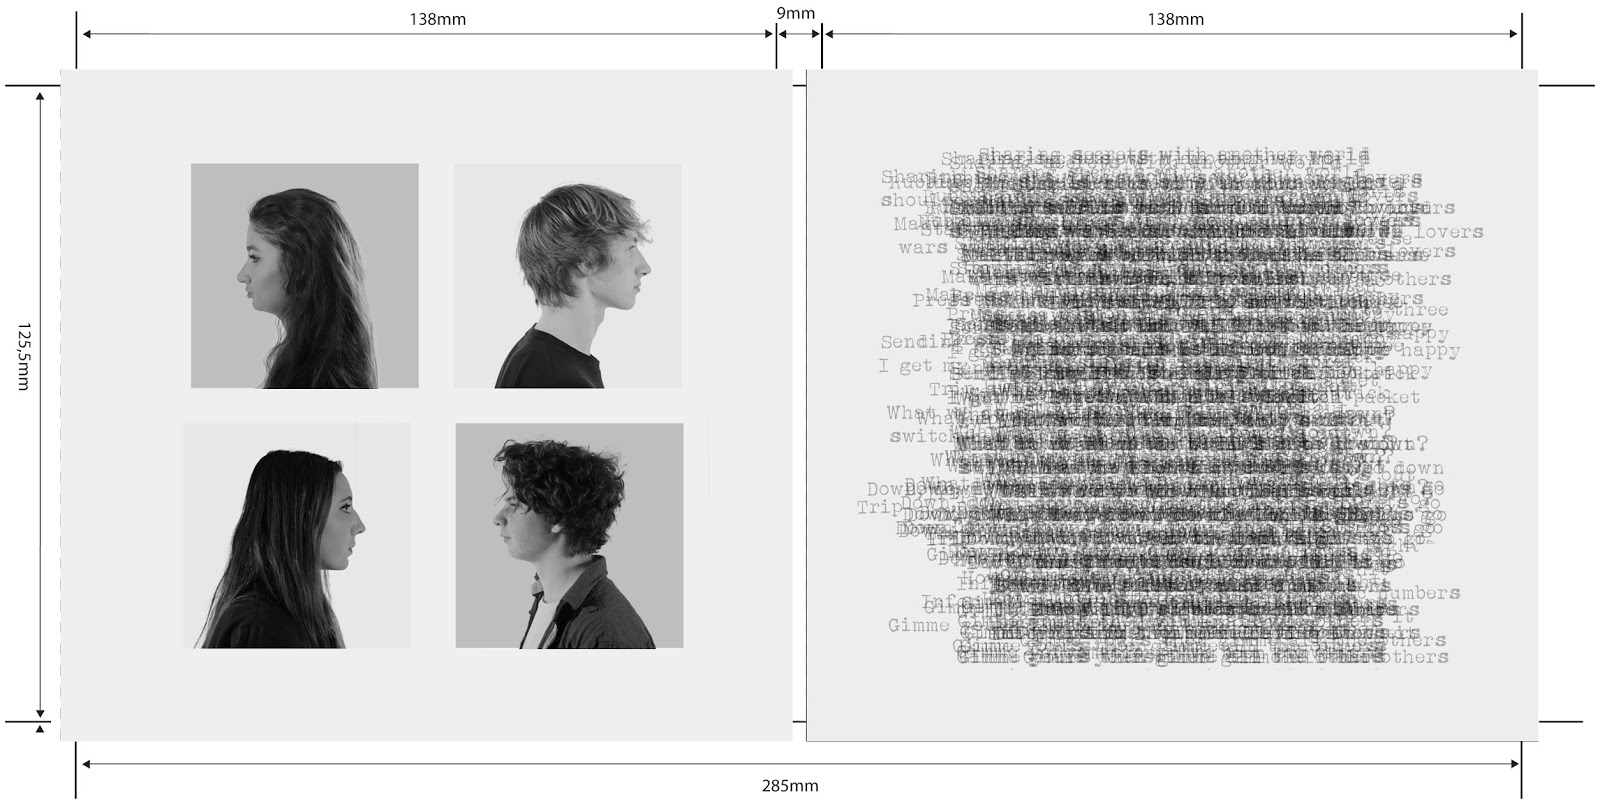
The Inside of Our Digipak
 Our website, please click on it to access.
Sunday 22 February 2015
R&P Post 20: Reflection so far/ looking ahead
I think our group has worked well together as we have all been on time and worked efficiently. We have shared the work load equally and each participated in the project. All our preparation has been very useful as it has helped us plan effectively and keep organised. It also meant that we had enough time to find and address any major issues before our real shoot, such as lighting and timings.
R&P Post 19: Our Rough Cut
The rough cut was very useful and helped us realize any continuity errors and jump cuts. By creating the rough cut on the same software we used for our animatic it made it very quick and easy to compare and was helpful as this would be the software we planned on using for our final edit.

To create our rough cut..
1) We will view all our rushes and select the best shots
2) We will then place them in a separate folder to make it convenient when we have to edit
3) We will then cut the shots and add them to the timeline (referring back tot he animatic)
4) We will then add all the different components such as the music and dialogue
5) Once all of the above is completed we will be able to add titles
Corrections we needed to make and how we plan to do so:
- We had a lighting problem so we spoke to our technician about it and he helped us by doing a demo with us in our media lesson.
- We were able to add and delete any shots that were missing or did not fit with our sequence before shooting our main sequence.
- We were able to change shots and the angle/positions we filmed from so that they did not break the 30 degree or 180 degree rule.
- Keep shots tight and the character always as the central image in the shots that focus on her as opposed to having a lot of space around her in the framing of the shots.
- Film shots as one whole shot rather than cutting it up as this caused jump cuts.
Wednesday 18 February 2015
R&P Post 18: Test shoot
 |
| Shot of all our different lipstick takes. |
 |
| Amy & Monica checking the lighting. |
- We were able to eliminate any mistakes that we could not fore-see
- We realized how much time we would need for the main shoot
- We were able to experiment with different shot types and angles
- I was able to get a feel for my character and practice my role
R&P Post 17: Our planned costumes and props, hair and make-up

Older, more traditional film noir-style films such as 'The Big Sleep', starring Lauren Bacall were very influential, shown to the right.

 |
| Before |
Our prop list consists of:
- Make-up; mascara, eyeliner, blusher, lipstick
- Perfume bottles
- A purse/bag
- Detective badge
- Passports and other cards
- Ipad
- Phone
 |
| After |
- Gloves
R&P Post 16: Casting
To choose an actress we must look at all our options and decide who would be most suitable.
Our main criteria for judging was:
 - Their availability
- How well they can act
- If they had the right style for our femme fatale

We decided that one of the members in our group should act in our media as this seemed more appropriate and guaranteed reliability. We then had to choose between myself and Amy and we tried to be as unbiased as possible when choosing. We chose myself as the actress and this is shown to the right, Monica took this photo at our test shoot.
As we are filming at my house it makes it easier for me to get ready before-hand so we won't waste time, I also have appropriate attire for our character which is convenient and we think that I fit the style and look that we are searching for.
Our main criteria for judging was:
- Their availability- How well they can act
- If they had the right style for our femme fatale
 |
| Head shots of Amy (above) and myself to the right). |
We decided that one of the members in our group should act in our media as this seemed more appropriate and guaranteed reliability. We then had to choose between myself and Amy and we tried to be as unbiased as possible when choosing. We chose myself as the actress and this is shown to the right, Monica took this photo at our test shoot.
As we are filming at my house it makes it easier for me to get ready before-hand so we won't waste time, I also have appropriate attire for our character which is convenient and we think that I fit the style and look that we are searching for.
R&P Post 15: Our planned filming location and set design

 to film at our house on our chosen dates. We have chosen to shoot at my house as it is convenient for all members of the group and it fits with the content we need in our filming, such as the mirror and sideboard in the hallway. I will post photos on our Facebook page to make sure that the setting is appropriate and that my group members like it.
 We must also consider mise-en-scene and we realized that we would need to dress the bedroom up so that it looked more like a single 20 year old female's room. We will achieve this by decorating the dresser with perfume bottles and hanging a pink silk gown on the door. In the hallway we decided we will have to take down most of the coats so that the character will appear to live on her own. This is in order to make our character and the setting easily identifiable to our audience.
To the left is a drawing of our setting in order to show where our actress will be positioned and where the camera will be.This is in order to make sure that when we film we do not cross or break the 180 degree rule. We have colour-coded and the red pen shows the actress, and the green shows the camera. Hopefully this will mean we avoid making any technical mistakes in our main shoot.
Monday 16 February 2015
R&P Post 14: Our production Schedule (shoot and edit)
 After creating our shoot board we have to decide on dates to do all our filming and we must make sure we get all our teachers' signatures and make sure that they are aware and agree to our plans.
We will decide the dates together so that we are sure that everyone can make the dates and we are all committed. This will help to avoid any last-minute plans or cancellations and keep us organised.
The dates we have chosen are:
- Test shoot - Saturday the 7th, 9 am to 4 pm
- Main shoot - Friday 20th, 9 am to 4 pm
- Back up shoot - Saturday 28th, 9 am to 4 pm
These dates are convenient for all of us and as we are filming at my house (location 1) my parents also agreed to these dates.
For our edit schedule we have agreed to meet every Monday and Wednesday lunch but we will also work on the project individually in our free periods in order to work more efficiently and quickly.
R&P Post 13: Our Shoot-Board
 After creating the animatic we decided to create a shoot-board which will allow us to put lots of information on one document and help us stay organised.
We will order the shots;
- by our two locations
- type of shot
We will place all the shots that were done in the bedroom upstairs together at the beginning and all the shots that were taken downstairs in the hallway together.
All our close-ups will be taken together and then we will shoot the mid-shots and then the master shots and long shots. This is seen below as all our close-ups, shown by the yellow post-it notes, are placed together.
 This will help us save time and will make filming easier as we will not have to keep moving equipment around. The shoot board will also help us keep track of the order we should be filming in.
R&P Post 12: Our Animatic
Once we had finished creating our storyboard we decided to create an animatic on Adobe Premiere Pro in order to help us view any changes that needed making which would save time when shooting. We will begin by taking individual photos of every shot and then changing the timing on the software so that they fit in with the timing we had planned for.
Our animatic will include:
- All our shots
- A music track
- Voice/over as a substitute for dialogue
- Credits
By having our content in video form we will be able to see if all our components listed above fit together well and if there was enough time for dialogue. We will add credits to see where we would position them in order to fit with the sequence and not detract attention from the protagonist's actions.
Our animatic was very beneficial as it allowed us to spot any mistakes such as jump cuts and breaking the 180 degree rule. We were able to see how all the elements of our project fit together before actually shooting anything which saved us a lot of time and helped us stay in control of our project.
Friday 6 February 2015
R&P Post 11: Our Storyboard
 |
| My group working on the storyboard. |
 |
| Our timeline. |
- help us figure out timings for our shots
- save us a lot of time when creating the storyboard.
- It will make it easier to spot mistakes on our own storyboard.
We decided to create a storyboard as we had researched and looked at 'P is for Psycho' which helped us learn how to create a storyboard and see how we should place shots together to work well.
The post-it notes will also be very useful as we can color-coordinate our shots, each colour will signify a different shot type.
- Pink - titles
- Orange - master shots
- Blue - long shots
- Green - mid shots
- Yellow - close ups
By using post-it notes it meant that any mistakes that were made were very easy to change and correct.
 |
| Close-ups of storyboard. |

 The storyboard:
- Made it a lot easier to view the shots to see if there were any continuity errors.
- Help us to identify our two different sequences-getting ready & the phone call.
- The large piece of sugar paper meant we could all work on it at the same time.
- Was created it in a linear fashion so our board reads from left to right.
- Has a total of around 30 shots to keep our opening not too long but not too short.
Thursday 5 February 2015
R&P Post 10: Reflections so far/ looking ahead
So far in our project I think we have managed time very well and have been on top of our project. We have met all the deadlines and not been rushed which has given us a lot of time to make changes and assess our project.
We have chosen our actress as myself as it is easier and more reliable. Props such as the gun and the red stilettos will be borrowed from the media department and I will wear my own clothes, preferably well-fitted and black/dark.
We will continue by creating a shoot board, animatic and a storyboard. We have done lots of research and hope that this will be evident in the next stages of our project. We hope that all our genre and target audience research will be connoted in our opening sequence.
Monday 2 February 2015
R&P Post 9: Our script
 We decided to include dialogue to hook our audience and reveal some clues about our main protagonist and the events that are about to unfold. The dialogue creates suspense which is typical of a film noir/crime film. The opening to 'Pulp Fiction' consisted of a scene in a restaurant between a couple discussing their next crime. More traditional noir-style films such as 'The Unsuspected' and 'Kiss Me Deadly' also included dialogue in their opening scenes.
Our Script will be portrayed by the female protagonist making a phone call and proceeding to say:
.jpg)
- 'Oh hello, I was just calling to say that I'm running slightly late.'
-'Haha, well you know what they say-first impressions count.'
-'I'm excited to meet you too!'
-'Alright then, see you soon.'
*Hangs up*
Sunday 1 February 2015
R&P Post 8: Our opening sequence idea
 Our opening sequence follows our main female protagonist getting ready. It begins by showing her pulling up her stockings, adjusting her outfit and applying her make-up without revealing her identity. We then see her tossing her detective badge across the floor in order to connote her evil, corrupt side. She then leaves her room and goes down the stairs into the hallway where she puts on her shoes and makes a phone call. We will then use a variety of shots such as mirror shots, close-ups and mid-shots to show her on the phone whilst looking at an iPad which contains images of the male she is supposedly going on a 'blind date' with. Once she has finished the phone conversation she opens a drawer in front of her to take out some gloves which is key iconography for a femme fatale character. When shutting the drawer again we see a gun is in there. She then picks up her bag and walks to the front door and as she opens it her identity is revealed and then the door slams and it cuts to the title of the film 'Unlawful'.
Our credits will all be on top of the shots apart from the institution and distributor logo which will be at the beginning and a graphic for the title at the very end. The font used for the graphics will be in white like it was in 'Seven' and 'The Last Seduction' and they will move position as it did in 'Dexter'.
All of our opening sequence will take place in a house with myself as the actress. When speaking the music will quieten but it will be playing throughout the whole opening.
The sound effects we will use are;
-the doing up of a zip
-walking down the stairs
-dialing of the keys on her phone
-opening&shutting the drawer
-the front door slamming
Subscribe to:
Posts (Atom)